Showing posts with label Kevin's Favorites. Show all posts

2014-10-29

Apple Pie Oatmeal in the Pressure Cooker

Apples.  Apples!  Apples are probably my #1 favorite fall food.  GASP!  But what about pumpkin everything!?!  I know, I know, pumpkins are great.  I love seeing pumpkin everything over the blogosphere, Instagram, and Pinterest, but apples will always have my fall heart.

Being from Washington, we have some of the best apples in the world.  I have memories as a small child bringing my dad a big apple to bite into and get started for my tiny teeth.  I remember making apple pies with my mom, and the smell that would fill the kitchen.  I remember all through high school my mom packing my lunch with an apple and peanut butter sandwich just about every day. (Ha!  I was geared towards being vegetarian before I knew it!)

It seems that every year I go apple picking or to produce stands, I find a new variety that I've never seen before.  Golden delicious had always been my favorite as a kid, but now I have discovered Jonagolds, Ambrosias, and Pink Ladies... I just can't decide!

This recipe is to appease that fall/holiday craving for apple pie, but in a Nutritarian-friendly way.  I would suggest using a sweater apple for the recipe, but feel free to experiment with your favorites!

Apple Pie Oatmeal (Pressure Cooker)
Time: 5 minutes prep, 3 minutes High Pressure, quick release
Servings: 4 servings
Ingredients:
        2 apples, washed, cored and finely chopped
        2 cups rolled oats
        2 1/2 cups water (more if you like your oatmeal thinner)
        1/2 tsp cinnamon
        1/2 tsp vanilla extract
        1/4 tsp ground ginger
        1/4 tsp nutmeg
Topping options: plant-based milk, almonds, walnuts, raisins, craisins, banana slices, etc.

Instructions:
1.)  Cut the apples and place them first into the pressure cooker.
2.)  Sprinkle the rolled oats and spices over the apples. (This will help keep the oats from sticking and make sure the apples get thoroughly cooked.)
3.)  Add water and lock the pressure cooker.  Set to high pressure for 3 minutes, then do a quick release after cooking.
4.)  Serve hot with any of the suggested toppings.  This time I added chopped walnuts and a bit of extra cinnamon.
Amy's Notes:
This recipe could easily be adapted for the stove top, but would just require more stirring and watching, and would, of course, take quite a bit longer.

Either way you make this oatmeal, be prepared for a delicious breakfast treat that reminds me of falls at home... can you tell I might be a bit homesick since our move across state?

Health and Happiness,

Amy

2014-10-15

Three Bean Chili (Pressure Cooker Friendly)

As I'm sure you guys have seen on my blog, my Facebook, and my Twitter and Instagram accounts, that I am OBSESSED with my new pressure cooker, the Instant Pot IPDUO-60.  Here are some of my favorite things about it:

It has made my kitchen cleaner.  Not only do I not require different pots and pans to saute, steam, and cook everything, but I haven't had to cook separate meals for my husband because he has been enjoying a lot of what I have been making. (More about the husband in another post.)  Also, as the Instant Pot is heating up, cooking, and depressurizing, I can easily have time to clean all of my prep dishes, set the table, and set out Tupperware for any leftovers.  The Instant Pot itself is also super easy to clean!  I made oatmeal the other day with not quite enough liquid, so some stuck to the bottom.  I had it washed out in just a few minutes with soap and water.  No scrubbing!

It has made me more sane.  Not only has cooking with the Instant Pot been easier to clean, it has given me back some sanity when I'm in the kitchen.  Instead of running back and forth between sauteing, chopping, and stirring, I can set my meal to go and leave it until its ready (or when I'm ready, thank you warmer).  No stirring involved!  And because the Instant Pot cooks faster than other methods, I don't feel like I NEED to multi-task to get a meal on the table in a timely matter.  I have been enjoying getting all of my ingredients ready to go, then starting with the Instant Pot, rather than jumping from the cutting board, to the stove top, then sink, and back again.

It has made my kitchen quieter.  When I imagined getting a pressure cooker, I was thinking it would be loud and make noises similar to a steaming teapot.  Wrong!  The only time the Instant Pot isn't perfectly quiet is when the lid opens and closes (happy little notes), it beeps to let me know it has started and finished, if you are sauteing something (which goes really quickly because it can get so hot), and if you do a quick release of pressure rather than a natural release at the end of cooking.  I'm sure Kevin would tell you (as he is trying to watch football) that my old kitchen cooking with pots and pans was much more disruptive.

It has helped me to be better organized.  Many of the recipes I have made so far include dried beans.  Because of this, I have been planning what I will be making a day or two before so that I can soak the beans while I am at work the day that I plan on using them.  I feel like I can also plan for the perfect amount of leftovers for lunch the next day for Kevin and I.  When I used to make things on the stove, I would have a difficult time estimating quantities and end up with too much food.  I would get sick of the leftovers and have to toss a lot out.

It makes meals more flavorful.  When cooking meals in the pressure cooker, you often have to add more amounts of spices, probably due to the lack of evaporation in the recipe and the reduced time in cooking.  That being said, once you do add the extra spices, your food comes out cooked perfectly and wonderfully flavorful.  I have found that I haven't wanted to add salt to anything I have cooked in my Instant Pot.

It has saved and is going to save us money.  Let's do a little bean math!  Just in this last week alone, I have made recipes with the equivalent of about 15 cans of beans (Keep in mind that my husband has been eating 1.5+ cups of beans a day, and we had my parents over to visit for the weekend).  At my grocery store, a can of low sodium beans costs around $1, making our weekly bean consumption equal to $15 worth of cans.  BUT, because of the pressure cooker, I have been using dried beans in all of our meals.

15 cans = 22.5 cups of beans
1 lb dried beans = 8 cups cooked beans
1 lb dried beans = $2
22.5 cups beans = 2.8 lbs dried beans = $5.63

That saves almost $10 in one week alone!  That equates to over $500 in savings over a year.  That number alone makes the pressure cooker worth the money!

Now, on to the recipe!  I made this in my pressure cooker as adapted from Lorna Sass' Black Bean Chili recipe from Great Vegetarian Cooking Under Pressure.  I started with her recipe and added in extra veggies, different beans, and different spices.  While this recipe was made in a pressure cooker, it can easily be done on the stove top or in a crock pot with pre-cooked beans (amounts in parenthesis).  Please see the instructions below for each adaptation.

Three Bean Chili
Time: 
    Pressure Cooker: 10 minutes prep, 12 minutes high pressure, 10 minute natural pressure release
    Stove top: 10 minutes prep, 30 minutes cooking (with canned beans)
    Crock pot: 10 minutes prep, 4 hours high/8 hours low (with canned beans)
Servings: 6-8


Ingredients:
    Soak:
        2/3 cup dried black beans, soaked for 8 hours (or 1 1/2 cup cooked black beans/1 can)
        2/3 cup dried pinto beans, soaked for 8 hours (or 1 1/2 cup cooked pinto beans/1 can)
        2/3 cup dried red beans, soaked for 8 hours ( or 1 1/2 cup cooked red or kidney beans/1 can)

    Saute:
        1 tsp cumin seeds
        2 cups onion, chopped
        1 Tbsp minced garlic

    Add:
        3 1/2 cups water or vegetable broth, boiling
        3/4 cup carrots, chopped, about 2 carrot sticks
        1/4 cup celery, chopped, about 1 celery stick)
        1 red bell pepper, de-seeded and chopped
        2 Tbsp mild chili powder
        1 1/2 tsp dried oregano
        1 1/2 tsp cumin
        1 tsp smoked paprika
        1/2 tsp coriander
        1/4 tsp cayenne pepper, optional

    After Pressure Cooking:
        1-14.5 oz can diced tomatoes
        1-14.5 oz can tomato sauce

    Topping Ideas:
        fresh cilantro
        fresh parsley
        cashew sour cream (recipe from Helyn's Healthy Kitchen)
        green onions
        nutritional yeast
        roasted red peppers
        black olives
        favorite hot sauce
        shredded vegan cheese


Pressure Cooker Instructions:
1.)  Rinse and pick over all of the dried beans.  In a large bowl combine all of the dried beans and cover with water.  Allow to soak for at least 8 hours.  Drain and rinse after soaking.
2.)  In the pressure cooker, saute the cumin seeds, onion, and minced garlic for 5 minutes, adding vegetable broth or water to prevent burning as needed.
3.)  Add the remaining ingredients, reserving the diced tomatoes and tomato sauce for after pressure cooking.  Stir well and lock lid into place, with the venting valve closed.  Set to manual high pressure for 12 minutes.  Once 12 minutes are up, allow the pressure cooker to go into warming mode for 15 minutes.
4.)  After 15 minutes, turn the warming unit off and quick release any remaining pressure, OR allow pressure to come all the way down naturally.  Stir in the can of diced tomatoes and can of tomato sauce.  Allow to cool and thicken with the lid off if time allows.  If you find the chili isn't thick enough, blend 1-2 cups in a high speed blender and return to the pot, or use an immersion blender.
5.)  Serve hot with any of the topping ideas above.


Stove top Instructions:
1.) Drain and rinse the 3 cans of beans.
2.) In a large dutch oven, saute the cumin seeds, onion, and minced garlic on high heat for 5 minutes, adding vegetable broth or water to prevent burning as needed.
3.)  Add the remaining ingredients including the diced tomato and tomato sauce.  Stir well to incorporate.
4.)  Bring to a boil, and then lower heat.  Cover and simmer for 20-30 minutes, stirring occasionally.  You may need to add more liquid as needed to achieve your desired chili consistency.  If you find the chili isn't thick enough, blend 1-2 cups in a high speed blender, or use an immersion blender.
5.)  Serve hot with any of the topping ideas above.

Crock pot Instructions:
1.) Drain and rinse the 3 cans of beans.
2.) In a frying pan on the stove top, saute the cumin seeds, onion, and garlic for 5 minutes.
3.) Add all ingredients, including the diced tomatoes and tomato sauce, to the crock pot.  Stir well to incorporate.
4.)  Cook covered in the crock pot on high for 4 hours or low for 8 hours.  You may need to add more liquid as needed to achieve your desired chili consistency.  If you find the chili isn't thick enough, blend 1-2 cups in a high speed blender, or use an immersion blender.
5.)  Serve hot with any of the topping ideas above.

Amy's Notes:
I have not tried this recipe on the stove top or crock pot, but I assume the results will be deliciously similar.

With the pressure cooker method, you can decrease the cooking time even more by using canned/cooked beans.  If this is the case, I would reduce the cooking time at high pressure to 7 minutes with a natural pressure release.  Just use your best judgement as you change the recipe!

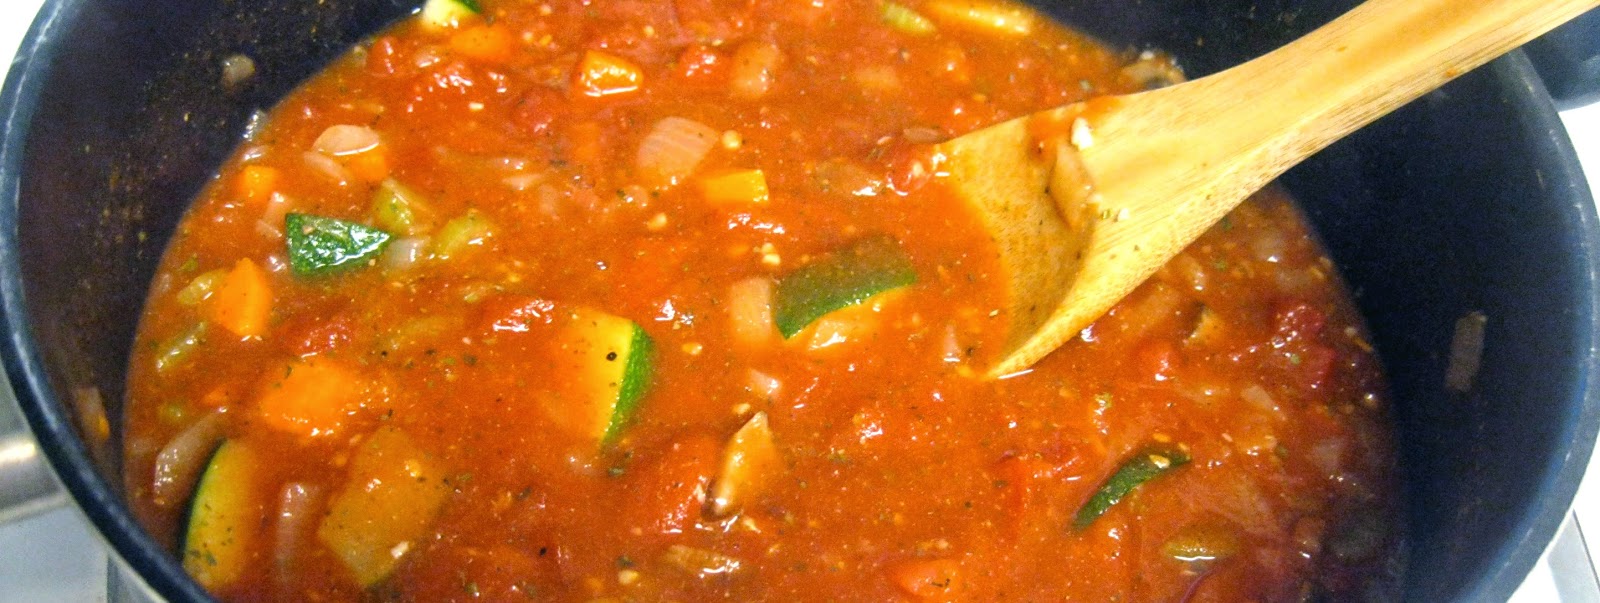
This chili is wonderfully flavorful!  I have been enjoying it on its own with some of the toppings above, but it would also be great served on any type of baked potato; with a cooked whole grain like brown rice, barley, or quinoa; or with tortilla chips on the side.  This time, I served mine with nutritional yeast, cilantro, green onions, and roasted red pepper.

Health and Happiness,

Amy

2014-09-25

Vegetable-Packed Tomato Sauce

Once every month or so I like to make spaghetti for me and Kevin.  It is a nice meal that will feed both of us rather than me making two separate dinners, and I can sneak in a bunch of veggies without Kevin knowing the difference!  Another nice thing about spaghetti night in a veggie-meat divided house is that I can make us noodles we both prefer.  I would rather have zucchini noodles, while Kevin likes more traditional pasta.
Since my parents visited the last weekend, my mom gave me a HUGE zucchini from her garden.  What the heck was I going to do with that much zucchini?!  Spaghetti and marinara of course!  When my parents visited, we also went to the cute little Farmer's Market in downtown Puyallup.  One vendor was selling homemade pasta, so I bought Kevin two "nests" of semolina fettuccine and chipotle adobo fettuccine.


Pasta?  CHECK!

Marinara sauce...

Vegetable-Packed Tomato Sauce
Time: 30 minutes
Servings: 4-6 servings
Ingredients:
    Vegetables to saute:
        1 small yellow onion, diced (1/2 large onion)
        1 lb fresh tomatoes, diced
        1 carrot, peeled and diced
        1 celery stalk, diced
        1/4 cup mushrooms, sliced
        1/4 cup zucchini, diced
        2 to 4 cloves garlic, pressed
    Sauce base and spices:
        1-15 oz. can tomato sauce
        1-15 oz. can diced tomatoes
        1 cup vegetable stock
        1 tsp parsley
        1 tsp oregano
        1 tsp basil
        1 tsp smoked paprika (optional)


Instructions:
1.)  Prepare all of the vegetables to saute.  In a large saucepan over medium-high heat, saute all of the veggies until the onions are translucent and the tomatoes start to breakup, about 10 minutes.

2.)  Add to the saucepan all of the sauce base and spice ingredients.  Bring to a boil and reduce heat.

3.)  Simmer uncovered for 15 minutes, until fragrant and well incorporated.

4.)  With an immersion blender, or in batches with a blender, blend the sauce to the desired consistency.

5.)  Serve hot over your favorite type of noodle (or not noodle).  Store leftovers in a closed container in the fridge for up to a week.  Or freeze in freezer-safe containers for next spaghetti night!


Amy's Notes:
When blending the sauce, you might want to keep it a little chunky, depending on your preferences and how well you cut up your veggies.  Since my husband is a bit anti-veggie, I like to blend it to a nice smooth consistency.

Along with the zucchini noodles, I wanted a bit of substance with some cooked red lentils.  Once cooked, they became a bit like meatballs, which was perfect.


Health and Happiness,

Amy

2014-06-29

Vegan Red Beans and Rice

While Kevin and I were on our (year and a half later) honeymoon last month, our cruise left out of Galveston, Texas, and we were determined to try some Cajun food before we headed back home.  We planned on staying two extra days after our cruise made it back to Texas so that we could check out the Houston Zoo and NASA Space Center.

The evening after the zoo, we explored a small pier area near our hotel close to NASA, called Kemah Boardwalk.  The little rides and shops were wonderfully picturesque, but unfortunately, it started to downpour with a huge thunder storm passing through.  In the distance about a half a mile from the boardwalk, we could see a place called the Swamp Shack.  With no taxis in sight, we decided to hike it through the storm to get our taste of Cajun food.

By the time we arrived at the restaurant, we were soaking!  We rewarded our daring hike through the storm with a pitcher of beer and ordered some delicious food.  Kevin got a giant platter of crawdads, while I ordered a big bowl of red beans and rice.  These beans were not Nutritarian-friendly and contained meat, but after a long trip, I was happy to have some beans in my system, and boy they were delicious!


Once we got home, I knew I would be able to recreate the Red Beans and Rice in a vegan version.  After doing some research on red beans and rice, I came up with my own recipe.  WOW!  This will be a new regular recipe for our household for sure!

Vegan Cajun Red Beans and Rice
Prep time: 12 hours, or 1 hour quick-soak
Cook time: 2.5 hours
Servings: 6-8
Ingredients:
        1 lb dried red beans, soaked over night or using the quick-soak method (see directions below)
        1 medium sweet/yellow onion, finely chopped
        1 red bell pepper, finely chopped
        3 celery stalks, finely chopped
        4 cloves garlic, minced (approximately 1 Tbsp)
        4 cups vegetable broth
        2 cups water
        1 Tbsp chili powder
        1 tsp smoked paprika (or add regular paprika and a drop or two of liquid smoke)
        1 tsp thyme
        1/2 tsp oregano
        1/2 tsp parsley
        2 bay leaves
        1/2 tsp cayenne pepper (optional)
        Fresh ground black pepper to taste

        Cooked brown rice or whole grain of your choosing
        Sliced green onions to top
        Favorite hot sauce to top

Instructions:
    Bean Pre-Soak:
        1.)  In a colander, rinse the dried beans and pick out any sticks, stones, or wrinkled beans.
        2.)  Place the sorted beans into a large pot and add water until the beans are covered by two or three inches of water.  Allow to soak overnight, or do the quick-soak.
        3.)  If you are choosing to quick-soak, bring the pot of beans and water to a boil.  Allow to boil for 2-3 minutes, then remove from heat and cover.  Allow to sit for 1 hour.
        4.)  After pre-soaking with either technique, drain the beans and rinse with cool, clean water.

    Red Beans and Rice:
        1.)  In the empty pot that the beans were soaking it, water saute over medium-high heat the finely chopped onion, bell pepper, celery, and garlic for several minutes, until fragrant and tender.  Add small amounts of water to prevent the veggies from sticking to the pot.
        2.)  Add in the spices, vegetable broth, water, and beans.
        3.)  Bring to a boil on high heat, then turn to low, COVER, and simmer for 2 hours.  Make sure to maintain a good simmer, increasing the heat as needed.
        4.)  After cooking for 2 hours, the beans should be very tender.  Cook for 30 minute increments at a time and test if they are not.  When tender, use an immersion blender or a hand-potato masher to mash some of the beans.  Do not puree the whole pot, you want most beans to remain intact.
        5.)  After lightly blending or mashing, allow the pot to simmer for 30 more minutes with the lid off, stirring every 5 minutes or so to prevent the bottom from burning.
        6.)  Serve hot with a hefty serving of the beans in a bowl and top with a few scoops of rice, green onion, and your favorite hot sauce.

Amy's Notes:
The traditional southern dish of red beans and rice, obviously, comes with rice, but feel free to use whatever whole grain you want.  I would suggest trying brown rice, wild rice, barley, farrow, or quinoa!

Feel free to make this dish as mild or as spicy as you want it by adding more cayenne pepper while cooking, or hot sauce when serving.

This recipe could work perfectly for a dinner party with vegans and non-vegans alike.  It would be really easy to cook up some andouille sausage on the side for meat eaters, like my husband, to add in to their liking.  some excellent side dishes could be corn on the cob, baked potatoes, and corn bread.  Yum!

2014-06-17

Birthday and Berry Pie with Chocolate Crust

Last Thursday happened to be my 24th Birthday... yikes!  Time is going by quickly!  To start off the festivities, we had dinner at my parents' house on Wednesday evening.  My mom made my favorite homemade veggie Thai pizza, and for dessert she made me this pie that I had sent her a link to months ago.  Thank goodness she saved it because this has got to be one of the best Nutritarian desserts I have ever EVER tried!

This recipe comes from the very talented healthy dessert creator, Talia Fuhrman.  Talia is Dr. Joel Fuhrman's daughter who has made a name for herself by blogging about health and beauty through nutrition and self love and respect.  She is truly a great resource and inspiration for the lady Nutritarians out there!  Find her blog here: http://taliafuhrman.com/

Her blog is full of delicious recipes, but she specializes in Nutritarian desserts like the one my mom made me for my birthday below.  Find her pie recipe here: http://taliafuhrman.com/berry-beautiful-berry-pie-with-chocolate-crust/

My mom tweaked the recipe a bit by using frozen blackberries in the filling rather than frozen strawberries. My husband, Kevin is a HUGE blackberry fan, so he happily accepted a big slice of this dessert. (Could it be that my husband is becoming an accidental Nutritarian?!  Doubtful, but a girl can dream, right? ;))  I don't believe she used chocolate or coffee extract in the recipe either.  It still turned out magnificent!

Berry Beautiful Pie with Chocolate Crust
By Talia Fuhrman
Recipe Source
Seriously, try this one!  My mom said it just took a few minutes to whip up.
My birthday present from Kevin:
a copper mug and all the ingredients
to make a Moscow Mule at home!


2014-06-10

Summer Vegetable Corn Chowder

I can't believe it has been so long since I last wrote a post.  Kevin and I went on a trip to Houston and a weeklong cruise that left out of Galveston, we took a quick weekend trip to Montana to meet my new twin nephews, and I just got back from a long weekend trip to Las Vegas with some of my best girlfriends to celebrate one of their bachelorette parties.  I had sooo much fun, although my apartment is in disarray from all of the packing and unpacking.

I also needed to go grocery shopping, badly!  I saw bell peppers, zucchini, yellow squash, and fresh corn on sale, so I got some inspiration to make this yummy yummy soup.  The smell in my house was such a hit with Kevin, he happily chowed down two bowls and voiced claim over some of the leftovers.  After so much traveling and eating out, nothing can be better than a homemade meal (but no one tell my veggie-snubbing husband just how many are in this recipe!).

Summer Vegetable Corn Chowder
Time: 60 minutes
Servings: 6-8 servings
Ingredients:
        4 medium zucchini, ends removed, halved and quartered
        4 medium yellow summer squash, ends removed, halved and quartered
        4 ears of corn, husks removed
        1 red bell pepper, diced
        1 orange bell pepper, diced
        1 yellow bell pepper, diced
        1 Anaheim or serrano pepper, diced
        1 yellow onion, diced
        1 12 oz package of soft silken tofu, undrained or pressed
        2 cups vegetable stock
        1 7 oz can fire roasted diced green chiles, undrained
        1 Tbsp chili powder
        1/2 Tbsp ground coriander
        1/2 Tbsp dried oregano
        2 tsp cumin
        1 tsp smoked paprika
        1/2 tsp cayenne pepper to taste
    Optional Toppings:
        fresh chopped cilantro
        sliced green onion
        fresh diced tomatoes
        hot sauce
        salsa
        pico de gallo

Instructions:
1.)  Wash the zucchini and squash, cut the ends off, then cut in half and then quarter.  In a large dutch oven, cover the zucchini and squash with water.  Bring to a boil, and then simmer for 20 minutes, until the squash is soft and lightly translucent.
2.)  With a pair of tongs, pull all of the zucchini and squash from the pot and into the blender.  Into the hot water, throw the peeled corn on the cob.  Bring to a boil and cook until tender.  While to corn is cooking, blend the zucchini, squash, and undrained silken tofu until smooth and creamy.
3.)  Once the corn is done boiling, remove and allow to cool.  Empty the water from the pot and begin to saute the red pepper, orange pepper, yellow pepper, Anaheim pepper, and onion over medium heat.  Add water as needed and saute until the onion is translucent.
4.)  Cut the cooked corn off of the cob and add it to the sauteed peppers and onion.  Add all of the spices and stir to combine well.
5.)  Add the blended squash and vegetable stock to the pot and stir to combine well.  Add water as needed to make the soup thinner if you desire.  Enjoy the soup chunky as is, or use an immersion blender like I did to lightly puree the soup.
6.)  Enjoy with one or multiple toppings mentioned above.  I served mine with tomato, cilantro, and green onion, drizzled with hot sauce.

Amy's Notes:
If you don't happen to have silken tofu on hand, some substitutions could be 1 cup of white beans, or 1/2 cup cashews and 1/2 cup water.
When everything is combined in the end, feel free to blend as much or as little of the soup you want.  Like I said above, I used my immersion blender to give it a fine chop.  Please cater to your own soup preferences!


2014-04-01

Mexican Pinto Bean Soup with Carrot Top and Cilantro Chimichurri

I was so excited to pick up my very first Full Circle basket earlier this week!  I decided to start adding a lot more organic foods into my repertoire, and the most affordable and time efficient way of making that happen (before the summer farmer's markets come) was to join Full Circle.  They are 100% organic and strive to provide as much local produce as possible.

Full Circle has its roots in CSAs, but in a way that is accessible and affordable for more people.  As of now they are available in California, Alaska, Oregon, Idaho, and Western and Eastern Washington.  They have 4 different sizes/prices of boxes depending on your family size or vegetable/fruit intake.  What I like best about it is that I can see what will be delivered a week in advance and change any of the items to another item from a list of 20 or more.  You can also add some grocery items to your cart from their big list of items, from fruits and veggies, to nuts, grains, and even flowers!

I will let you guys know my opinion of them as time goes on.  This was my box this week:


This week I got apples, carrots, snap peas, tangerines, braising cut greens mix, and cilantro.  I added on extras of kale raab, red chard, and yellow onions.
Overall, I'm pretty happy with the quantity and quality of the produce.  The only thing that left something to be desired was the kale raab (very center with yellow tab).  I haven't tried it yet, but the bunch was significantly smaller than I was expecting, but braising cut greens mix and red chard made up for it.  I'm also super excited to try out the sugar snap peas sometime this week!

Obviously, with all of this fresh organic produce, I just HAD to make something new!  I used some of the carrots, an onion, and the cilantro and carrot top greens in the recipe below.  Hope you enjoy!

Mexican Pinto Bean Soup
Time: 15 minutes prep, 40 minutes cooking
Servings: 10-12
Ingredients:
        4 cups filtered water
        4 cups vegetable broth
        3 cups pinto beans (homemade or 2-16 oz cans rinsed and drained)
        2-16 oz cans diced tomatoes, undrained (I used petit diced tomatoes)
        1 lb. red potatoes, cut into 1/2 inch cubes (about 4 cups)
        4 medium carrots, peeled if not organic, and chopped
        3 medium celery stalks, chopped
        1 medium onion, peeled and finely chopped
        1/4 cup chopped green chiles, fresh or canned (optional)
        2 Tbsp tomato paste
        1 Tbsp your favorite no-salt seasoning
        1 Tbsp chili powder
        1 tsp cumin
        1 tsp ground coriander
        1 tsp paprika
        1/2 tsp onion powder
        1/2 tsp garlic powder
        1/2 tsp cayenne pepper (optional)

(Optional creamier soup variation, as pictured)
        1/2 cup cashews
        1/4 cup nutritional yeast
Note that I used tomato paste, pinto beans, and green chiles that I had frozen.  That's why they look a little funny in my ingredients picture above. ;)
Instructions:
  1. Prep all ingredients and add them to a large stovetop pot (except creamier soup ingredients).
  2. On medium-high heat, bring to a boil, and reduce heat to a simmer.
  3. Allow to simmer, uncovered for about 30 minutes, or until potatoes can be easily pierced with a fork and the other vegetables are tender, stirring occasionally.
  4. (Optional Creamier Soup Step) Once the soup is done cooking, scoop a cup or two of the soup into a high powered blender along with the cashews and nutritional yeast.  Blend on high until smooth and creamy.  Add back to the soup and stir to combine.
  5. Serve hot and topped off with Carrot Top and Cilantro Chimichurri.


Amy's Notes:
When I heated this up to serve the next day.  I added a little bit of leftover quinoa to the mixture and it went over very well with my tried and true taste testers (a.k.a Mom and Dad :)), not to mention, quinoa added a bit more protein to the soup.
If you don't have the ingredients to make the chimichurri below to add to the soup, fresh chopped cilantro will give you a similar taste.

Carrot Top and Cilantro Chimichurri
Time: 10 minutes
Servings: use as a condiment
Ingredients: 
  • large bunch carrot tops, stems removed
  • bunch cilantro, roughly chopped with the stems removed
  • 3 cloves garlic
  • 1/2 cucumber
  • 1/4 cup water
  • 2 Tbsp lime juice (lemon or rice vinegar would work too)
Instructions: 
Combine all ingredients into a food processor.  Process until well combined, but chunky like a pesto.  Serve as a dip, as a spread, in a burrito, or any way that you might use a condiment.  I decided to top my soup off with it.  Mixed in, it complemented the soup perfectly!

Amy's Notes:
Who knew that carrot top greens could be so flavorful?!  I think pre-ETL, I probably just would have tossed them thinking that they were inedible.  So happy I found a good use for them for when I get carrots again in my Full Circle box. :)

Here is a picture of the chimichurry mixed into the soup.... Not nearly as pretty, but boy does it taste delicious! 

2014-01-06

Spicy Indian Dal

****Check out the new "Pin it" feature on each of my pictures!  If you hover over the picture, the "Pin It" logo will appear, allowing you to pin any image from this post.  I will continue to do this with all of my future posts.  Thanks to my readers for the suggestion!****

Over the last few months since I have been on a blogging hiatus, I have fallen in love with Indian food.  Locally, we have one of the best Indian restaurants, and we enjoy going there once or twice a month, usually with my parents.  Although they have quite a few vegetarian options, I know that there is a ton of oil/ghee in all of the recipes.  Since I was craving Indian food this Sunday, I decided to make a big batch of Indian spiced lentils. 

Ingredients: 
2 cups dried mixed lentils (I used 1/3 cup of each pictured)


1 can diced tomatoes
1 can lite coconut milk
2 medium sized tomatoes (or an extra can of diced tomatoes)
1 red bell pepper, stem and seeds removed (yellow or orange bell peppers work too)
1/2 yellow onion
1 dried red chile, stem and seeds removed
Spices:
  • 1-1/2 Tbsp ground corriander
  • 2 tsp cumin seeds
  • 1 tsp ground cumin
  • 1 tsp paprika 
  • 1 tsp dried basil
  • 1/2 tsp cayenne pepper (more or less as desired)
  • 1/2 tsp ground cinnamon
  • 1/4 tsp ground cloves
  • 1/4 tsp turmeric 

Instructions:
  1. In a large pot, bring the mixed lentils and around 8 cups of water to a boil.  Reduce to a simmer and allow the lentils to cook for 20-30 minutes, stirring occasionally, until "al dente".  Pour into a strainer and allow to drain while you prepare the sauce.
  2. In a high speed blender, combine the canned and fresh tomatoes, bell pepper, coconut milk, onion, and chile.  Blend until the creamy and the dried chile has been broken into very small flecks.
  3. Return the empty pot to the stovetop and pour in the tomato sauce mixture you just blended.  Heat over medium heat until simmering and add the spices and cooked lentils back into the pot.  
  4. Simmer until the lentils are thoroughly cooked and the sauce has reduced to become creamy.  Adjust spices to your liking.  (I generally add extra cayenne pepper for some extra heat at the end.)
  5. Serve hot over your preferred grain.  I served mine with mixed quinoa and steamed kale.


Amy's Notes:
I was so excited yesterday (and today) that Kevin was willing to try this dish and actually asked for a bowl or two for himself.  I guess I will have to keep this recipe in my regulars.  ;)

I absolutely LOVE lentils!  They are great to add to soups, salads, you name it.  It is a big plus for me that they cook up relatively quickly without needing any soaking.  I am lucky enough to have a few grocery stores to choose from where I can get all of the varieties below in the bulk section at a relatively decent price. 

What is your favorite way to enjoy lentils?


2012-09-22

Katie's Creamy Potato Leek Soup


Hope everyone is having a great weekend so far!  I've been busy with cooking, cleaning, and hanging out with friends.  Friday night a few of us went to the Spokane Oktoberfest to try out a few beers from over 20 different breweries.  It was a great time out with friends being beer connoisseurs.
Everyday Vegan Girl
For Healthy Vegan Friday I will be featuring the soup I had for dinners and I featured in this week's What I Ate Wednesday.  My sister-in-law Katie sent me this recipe after she had described it to me as "Amazing!"  I found it to be a great recipe to use up some of the vegetables I had left from the veggie trays at our reception (the carrots and celery).  It is so simple, yet delicious.  Hope you give it a try!

Ingredients:

  • 2 large leeks, roughly chopped
  • 6 medium potatoes (or equivalent red potatoes), diced
  • 2 medium carrots, sliced
  • 2 medium celery stalks, sliced
  • 8 cups water
  • 2 cups non-dairy milk (optional)
  • Salt and pepper to taste
  • Some suggested spice combinations:
    • 1/2 tsp thyme and 1/2 tsp marjoram
    • 1 tsp rosemary
    • 1/2 tsp basil and 1/2 thyme
Directions:
  1. Chop the leeks, carrot, and celery, and water saute in a dutch oven or large pot for about 10 minutes.
  2. Add your selected spices to the vegetables while they are sauteing.
  3. In the meantime, scrub potatoes and chop into 1 inch chunks (peeling optional).
  4. Add potatoes, water, and salt to pot.  
  5. Bring to a boil.
  6. Cover and reduce heat to simmer for 20-25 minutes or until potatoes are soft.
  7. Use an immersion blender to puree the soup to a creamy consistency.
  8. Stir in milk to thin and give a creamier taste (optional).
Amy's Notes:
This a fairly versatile soup in how you decide to make it.  I used red potatoes and left the skin on, but you could easily use russet potatoes and choose to leave the skins on or off.  Also, if you don't happen to have leeks on hand, you might be able to use an onion or three in replacement.  The spices in this recipe are also very versatile.  Whatever your spice/dried herb preference, give it a try with this soup.  From the pictures you can tell that the soup in the pot is not as light in color as the soup in my bowl.  This is because I added a bit of almond milk once I served the soup.  This worked well for Kevin and I because he preferred to add his regular milk while I added my non-dairy milk.  This little trick also is great for saving room in your fridge with the leftovers.  If you don't add the milk until you are going to eat the leftovers, it will allow you to store thicker soup in smaller containers to save room in the fridge.
What is your favorite versatile recipe or your favorite recipe to use up vegetables in your fridge?